|
+Pro/ENGINEER Mechanism Intensive
Course Duration: 16 Hours
Tuition: $1500.00 USD
Overview: This course is intended as
a 2 day intensive on using Pro/MECHANISM in detail with an emphasis on
your specific interests if a longer customized course is necessary You
will learn to use “connections” and “drivers”
to build elegant assembly models using existing ProE parts, and you
will learn how to convert an existing ProE assembly into a Pro/MECHANISM
assembly. You will learn how to use this module to perform optimization
studies, find motion envelope information, do dynamic global interference
checks, and create assembly demonstration movies. These movies can be
incorporated into PowerPoint Presentations for use in design reviews
and sales presentations to effectively communicate in action how your
assembly is intended to function and effectively impress your management,
marketing or sales personnel. The end result will be reduced design time and higher
design confidence by providing concurrent simulation of potential interference
over a range of motion resulting in failures before prototypes are created.
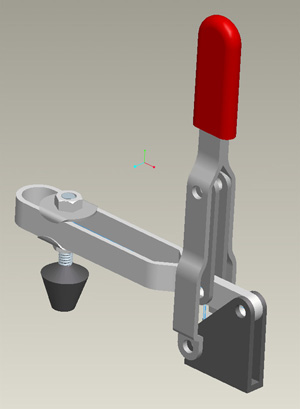 |
Class
example: Clamp Assembly
Here we add rotational servo motors to power the clamp handle about its rotation axis. Using connection definitions, we can specify a limited sweep angle on the handle to avoid the linkage from jamming. Global interferences can be detected using the Analysis and Playback features in Pro/Mechanism.
|
Prerequisites: 1,000 hours minimum
experience with Pro/ENGINEER
Topics:
- Basics of high end assembly constraints
- Mechanical degrees of freedom concepts, and how it relates to an
assembly.
- Using "connections" instead of "constraints"
- Types of connections: Sliders, pins, gears, slots, cylinders, etc.
- Moving your mechanism manually by "grabbing" it with your virtual
hand.
- Creating "motors" or drivers to automatically move your more complicated
assembly apparatus using equations, and tables.
- Understanding the types and effects of dynamic motion (position, velocity,
acceleration) when choosing the right driver equation or table.
- Dynamic global interference checks
- Output of digital movies - link them into Powerpoint etc. for manager
presentations.
- The use of this powerful tool with other simulation and optimization
tools.
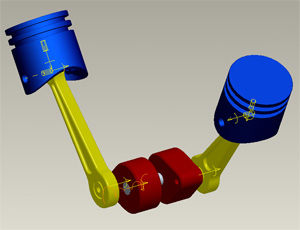 |
Class
example: Powered Piston Assembly
Click to see an animation of the pistons riding designated straight paths, powered by servo motors in Pro/MECHANISM. |
| |
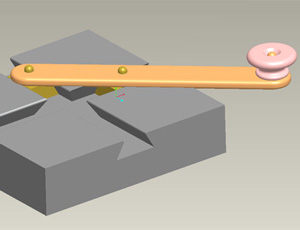 |
Class
example: Slider
and Grinder Assembly
This tutorial goes over forcing the small V-blocks to only ride within the V-cut grooves. Mating the crank's holes to the V-blocks allows them to ride simultaneously as the crank is turned. |
Day 1
Project 1:
Build a simple Four Bar Linkage. Watch how the links interact with each other just by driving one of them. Experiment with using links of different sizes together.
Project 2:
Create the Slider-Grinder apparatus.
Project 3:
Create the Clamp Assembly and observe how rotating the handle beyond a certain equilibrium point prevents the output link from back-driving the system, effectively locking the clamp in position.
Project 4:
Assemble piston and crank parts, and use servo motors to power the configuration, driving the piston up and down.
Project 5:
Create a Backhoe Linkage using simple parts and constraints.
Convert linkage into a Mechanism by converting standard constraints into
connections.
Grab linkage and move it to its mechanical limits.
Insert servo motors to power the piston links to drive the linkage.
Create “snapshots” of mechanism at initial and final positions.
Discussion:
Discuss the purpose and functionality of the buttons while in Mechanism
mode.
Discuss scenarios when this powerful Pro/E module would be useful.
Discuss connections vs. constraints and degrees of freedom
Discuss Wildfire 2.0 vs Wildfire 4.0 iconography.
Day 2
Discuss the differences between using a Pro/SKELETON and a Pro/MECHANISM
to simulate motion and the effects of design changes with each method.
Discuss Pro Simulation “measures” and load graphs in the context
of Pro/Mechanism.
Discuss connection “order” and component packaging loops that
close with last component leaving a fully constrained assembly.
Discuss external references and assembly “etiquette” while
creating mechanized drivers.
Discuss the pros and cons of each type of driver table (Position, Velocity,
Acceleration) and choosing the best one to simulate your type motion.
Project 6: Convert an assembly of your
choice into an assembly and Output the results in the form of a movie.
Project 7: Convert a garage door into
a fully animated assembly and find the best equation or table to use as
a driver to best simulate the motion of the door in the track. Determine
the optimum location of cable tension monitor. Make a movie and Power
Point Presentation of the results. Demonstrates a wide variety of concepts
that have been discussed.
Project 8: (Advanced). Find the weakest
link in the Backhoe linkage you built in Exercise 5, by finding the greatest
load in each link during its motion envelope.
 |
| Crescent
Rapid Rench TM |
|